
Affiliate Disclosure
Some links on this page are affiliate links. As an Amazon Associate, we earn from qualifying purchases — at no extra cost to you. We do not buy, test, or physically handle the products we cover; our rankings come from aggregated owner reviews, ratings and expert consensus. Commissions never change our verdicts. How we rank & full disclosure.
Brake fluid is one of those topics people gloss over during a pad swap. The pads are the star of the show, right? But ignoring the fluid side of a pad change is how you end up with a spongy pedal, a reservoir overflow, or — worst case — no stopping power on your first drive out of the driveway. This guide covers everything you need to know about brake fluid when changing pads, written plainly and without the fluff.
Why Your Brake Fluid Level Rises When You Change Pads
Here’s the physics that catches people off guard. When brake pads wear down, the caliper pistons gradually extend outward to keep the pads in contact with the rotor. As the pistons push out, the fluid level in your reservoir drops — which is why an unusually low reservoir can actually signal worn pads.
When you install new pads, you compress those pistons back into their bores to make room for the thicker pad. All that fluid the pistons were holding gets pushed back up the hydraulic line and into the reservoir. If you topped the reservoir up before starting the job, it will overflow — potentially spilling brake fluid onto your paint, your hoses, and your skin. Brake fluid strips paint fast.
Rule one: do not add fluid before compressing the pistons. Check the level first. If it’s close to the brim, remove some with a turkey baster or fluid transfer pump before you compress the caliper. You want it sitting around the halfway mark before you push those pistons back.
Need a clear walkthrough on compressing the piston itself? See the guide on caliper piston wind-back — including what to do on rear calipers that screw in rather than press straight back.
Do You Need to Bleed the Brakes After a Pad Change?
The short answer is: probably not, but it depends on what you did during the job.
If you never opened the hydraulic system — meaning you only compressed the piston without cracking the bleeder screw and without disconnecting any brake lines — no air entered the system. You do not need to bleed the brakes. The fluid circuit stayed sealed.
If you cracked the bleeder screw while compressing the piston (more on why you might want to do exactly that, below), you introduced a potential air pathway and you should bleed that corner before driving.
If you disconnected a caliper, replaced a rubber hose, or had any leaks, bleed the whole system. No exceptions.
That said, a pad change is an excellent opportunity to flush the fluid even if bleeding isn’t strictly required. If the fluid is more than two years old or has turned dark brown, do the flush while you have the wheels off and the calipers accessible. It’s minimal extra work and meaningfully improves braking performance in high-heat situations.
The Smarter Way to Compress the Piston: Use the Bleeder Screw
Most DIYers push the piston back by pressing against it with a C-clamp or piston tool while the bleeder screw is closed. The fluid then gets pushed backward through the ABS modulator, carrying with it any debris or degraded fluid sitting at the caliper end of the system. This can contaminate ABS valve seats and cause problems down the track.
A cleaner method: crack the bleeder screw open before compressing the piston, route the expelled fluid into a catch container, then close the screw once the piston is seated. The dirty fluid exits the system at the caliper rather than traveling backward through your ABS unit. You will need to bleed that corner afterward, but your ABS modulator stays clean. It’s the approach most professional technicians use, and it’s worth the extra ten minutes.
DOT 3, DOT 4, DOT 5.1 — What Actually Matters
Brake fluid is rated by its dry and wet boiling point. Higher DOT ratings mean higher boiling thresholds, which matters most under repeated hard braking that generates heat in the caliper.
- DOT 3: Minimum dry boiling point of 205°C. Common in older vehicles and light-duty passenger cars. Absorbs moisture quickly.
- DOT 4: Minimum dry boiling point of 230°C. Now the standard for most modern vehicles. Still hygroscopic.
- DOT 5.1: Minimum dry boiling point of 260°C. High-performance applications. Compatible with DOT 3 and 4 systems. Still hygroscopic.
- DOT 5 (silicone): Not hygroscopic, but incompatible with ABS systems and seals designed for glycol fluid. Not recommended unless your vehicle specifically calls for it. Do not mix with DOT 3/4/5.1.
DOT 3, 4, and 5.1 are all glycol-based and are broadly compatible, though you should always use the grade specified in your owner’s manual or higher. Never go lower than spec.
Why Hygroscopic Fluid Ages Out — And Why the Two-Year Rule Exists
Glycol-based brake fluid absorbs moisture from the atmosphere over time. It does this through the reservoir cap, through rubber hoses, and through microscopic pathways in the system. As water content rises, the fluid’s boiling point drops — sometimes dramatically.
Fresh DOT 4 boils at 230°C minimum. Fluid with just 3.7% water content (the “wet” equilibrium point) can boil as low as 155°C. Under hard braking — descending a mountain road, towing, or repeated stops in traffic — fluid near boiling point vaporises inside the caliper. Vapour compresses; fluid does not. The result is a spongy or fading pedal under exactly the conditions you need the brakes most.
Flush every two years regardless of how the pedal feels. Fluid can be well past safe boiling thresholds before you notice any change in pedal behaviour on normal streets. This is not a cosmetic service — it’s a safety interval.
The One Safety Step You Cannot Skip: Pump the Pedal Before Moving the Car
This is the most important safety note in this entire article. Read it twice.
After compressing the caliper pistons and bolting everything back up, the pistons are sitting fully retracted inside their bores. The new pads are not yet making contact with the rotor. If you start the car and reverse out of the driveway, your first press of the brake pedal will go straight to the floor. You will have no braking force until the pistons extend back out to contact the pads.
Before you move the car: sit in the driver’s seat with the engine off, and pump the brake pedal repeatedly until it feels firm and high. You will feel it build over three to five pumps. That firmness tells you the pistons have extended, the pads are seated against the rotor, and the hydraulic system is pressurised correctly.
Only after you have a firm, high pedal is it safe to move the vehicle. Not before. This step is not optional.
Soft or Spongy Pedal After a Pad Change: What It Means
If you pumped the pedal and it still feels soft, mushy, or gradually sinks under steady pressure, you have trapped air somewhere in the hydraulic circuit. Air is compressible; it absorbs pedal travel that should be going into clamping force at the caliper.
Common causes after a pad change:
- The bleeder screw was cracked open and not fully purged before closing
- The reservoir ran dry at any point during the job
- A rubber hose was disturbed and allowed air ingress
- Fluid boiled during a previous drive and vapour pockets remain
Do not drive on a spongy pedal. Bleed the affected corner first. If the pedal is soft across the board, bleed the full system in the correct sequence for your vehicle (typically starting farthest from the master cylinder). A pressure bleeder or vacuum bleeder makes this a one-person job.
A spongy pedal is also one of the brake warning signs covered in the signs of worn brakes and safety checks guide — worth reading if you want to understand the full picture of what your pedal feel is telling you.
Quick Pre-Drive Checklist After a Pad Swap
- Reservoir cap is fully seated. A loose cap lets moisture in faster and can spill fluid on the engine bay.
- Bleeder screws are tight. Finger-tight is not enough; they need to be torqued to spec (typically 8–12 Nm) or they will weep under pressure.
- No fluid on rotors or pads. Even a small amount of brake fluid on a rotor destroys braking performance immediately. Clean any spills with brake cleaner before reassembly.
- Caliper bolts torqued to spec. Not guessed. Use a torque wrench.
- Pedal is firm before moving the car. See above. Non-negotiable.
- Bed-in run completed. New pads need to be heat-cycled to transfer an even layer of friction material onto the rotor. Perform a series of moderate stops from 35 mph down to 5 mph, allowing cooling time between runs. Full bed-in procedure is in the step-by-step brake pad replacement guide.
Putting It Together
Brake fluid is not a passive bystander in a pad change — it actively responds to what you do with the caliper. Pull fluid out before you compress if the reservoir is full. Use the bleeder screw method if you want to keep your ABS clean. Flush old fluid while you’re in there if it’s been two years or longer. And never, under any circumstances, move the car before you have a firm pedal.
Get these details right and the rest of the job — covered fully in the Brake Pad Refresh hub — goes smoothly. Get them wrong and you have a safety issue, not just a mechanical one. Take the extra five minutes. It’s worth it every single time.
Recommended Products
We aggregate owner reviews rather than bench-test parts ourselves. These are the fluids and pads owners consistently rate for a brake refresh — match the fluid grade to what your reservoir cap specifies, and confirm pad fitment for your exact car before buying.
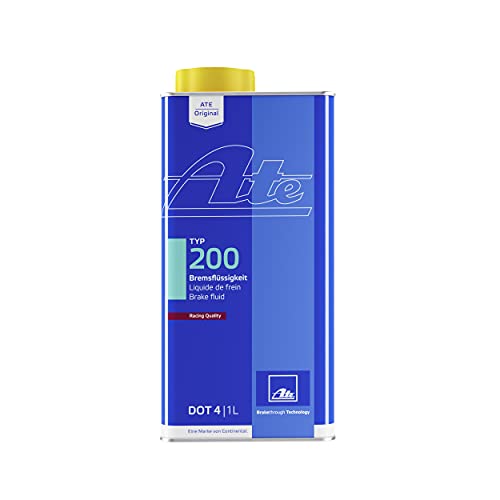
Best for a modern car that deserves a high-boiling DOT 4 flush during the pad change
- DOT 4 with a high dry boiling point for spirited street driving
- Glycol-based — compatible with DOT 3/4/5.1 systems
- A 1L bottle is enough to properly flush most cars
- Long-trusted by enthusiasts for its consistency
Why buy it: a pad change is the ideal moment to flush old fluid, and this is a strong, widely trusted DOT 4 to do it with.
Best for an everyday car that just needs fresh, in-spec fluid for topping up or bleeding
- Meets DOT 3 spec — check your reservoir cap first
- Synthetic glycol formula
- Cheap enough to bleed a corner generously
- Stocked almost everywhere
Why buy it: no-nonsense fluid for the top-up or corner bleed you may need after compressing the caliper pistons.
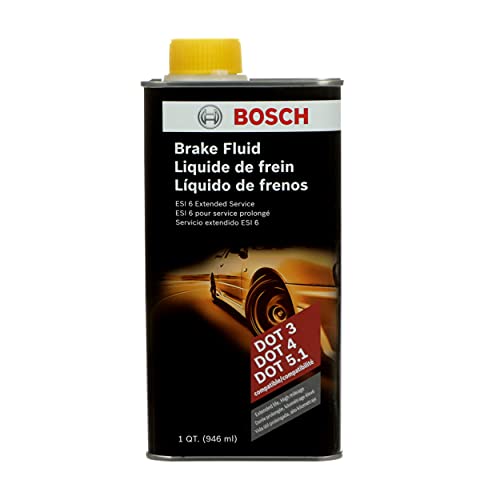
Best for owners who want to stretch the two-year flush interval
- Covers DOT 3, 4 and 5.1 systems in one bottle
- Extended-life formula resists moisture uptake
- One 32oz bottle suits most full flushes
- Handy if you service several vehicles
Why buy it: a versatile, longer-lasting fluid if you would rather not flush on the strict two-year clock.

Best for quiet, low-dust daily driving when you refresh pads and fluid together
- Ceramic compound — low noise and low dust
- OE-supplier pedigree
- Gentle on rotors
- A frequent top pick in owner reviews
Why buy it: the pads to pair with fresh fluid if you are doing the whole brake refresh in one session.

Best for a supported-brand ceramic pad with the hardware already in the box
- Ceramic friction with a rubber-core shim for quiet stops
- Includes hardware and shims
- Broad fitment across common cars
- Strong owner rating for the price
Why buy it: value pads that come with the shims and hardware, so you are not chasing extra parts mid-job.

Best for track days and repeated hard braking that cooks ordinary fluid
- Very high dry boiling point for heat resistance
- DOT 4 racing formula
- Resists the fade that causes a long pedal
- A paddock staple
Why buy it: the fluid to reach for if your pad change is really prep for track or spirited driving.
Prices are pulled from Amazon and were accurate as of Aug 22, 2026, 6:54 PM EDT. Product prices and availability are subject to change — the live price is shown on Amazon.