
Affiliate Disclosure
Some links on this page are affiliate links. As an Amazon Associate, we earn from qualifying purchases — at no extra cost to you. We do not buy, test, or physically handle the products we cover; our rankings come from aggregated owner reviews, ratings and expert consensus. Commissions never change our verdicts. How we rank & full disclosure.
Short version: Drill-attachment kits swap your elbow grease for a spinning disc, giving faster and more even results than hand-sanding — a real advantage on heavy oxidation or multiple cars. Any basic drill works. The rules don't change though: keep the sanding wet, don't skip grits, use light pressure, and always finish with a UV seal or it re-yellows.
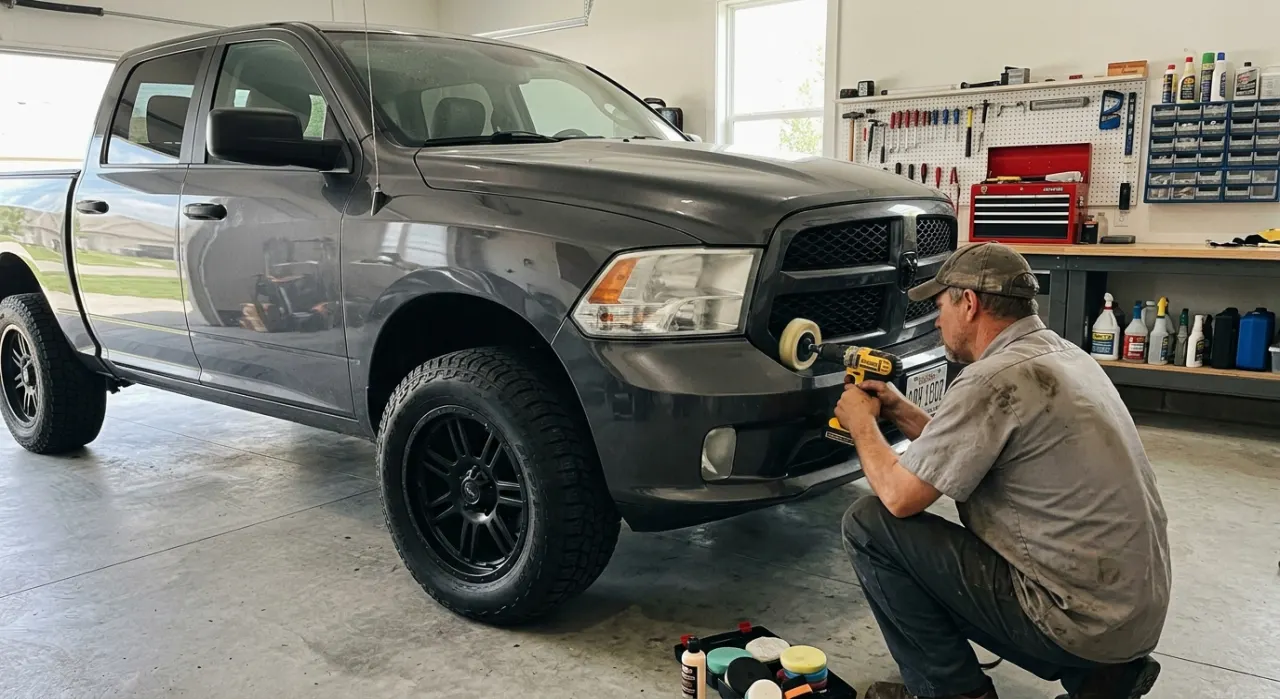
Hand-sanding a headlight works fine, but it's slow and your arm knows it by the end. If you own a drill, there's a faster path that also tends to come out more even: drill-attachment restoration kits. I've run both, and for most people the drill version is the smarter buy. Here's how they work, what to look for, and where the pitfalls hide.
How drill kits work
A drill kit follows the exact same logic as hand restoration — sand away oxidation, compound and polish to clarity, then seal — but it mounts the abrasives on discs that chuck into your drill. Typically you get a backing pad plus a stack of sanding discs in ascending grits, a foam or wool polishing pad, compound, and (in the good kits) a UV sealant.
Instead of dragging paper by hand, you let the spinning disc do the work while you guide it across the lens. Because the disc rotates at a consistent speed and pressure, it removes material more uniformly than a tiring hand ever will. That even action is the main reason drill results often look a step cleaner than hand jobs, particularly on badly oxidized lenses. The underlying process is identical to the one in our full restoration guide — the drill just powers the abrasive stages.
The real pros and cons
They're not magic, so here's the honest trade-off.
- Faster. A drill chews through the sanding stages in a fraction of the time, which matters most on heavy fog where hand-sanding is a slog.
- More even. Consistent rotation avoids the patchy pressure of hand-sanding, so you're less likely to leave a shiny un-sanded spot.
- Less fatigue. Doing both headlights — or a whole family's worth of cars — is far easier on your arms.
- Slightly more to control. A spinning disc needs a little respect. Too much pressure or dwelling in one spot can dig in or heat the plastic.
- Needs a drill. Obviously. If you don't own one, a hand kit may be the cheaper total spend.
On cost, drill kits usually sit only a little above hand kits — worth it if you value the time and evenness. We compare the full price picture in DIY vs pro cost.
What to look for in a drill kit
Not all drill kits are equal. When you're choosing, check for:
- A proper grit range. Multiple sanding disc grits that step up sensibly — a kit with only one or two grits will leave scratches. You want a progression, the same principle as in our wet-sanding grit guide.
- A sealing step included. This is the one that separates a lasting kit from a disappointing one. If it doesn't come with a UV sealant, budget for one separately — it's non-negotiable, as we explain in sealing headlights so they stay clear.
- A backing pad that fits a standard drill. Almost all do, but check the arbor/chuck compatibility.
- Enough discs for the job. Cheaper kits skimp on disc quantity, and worn discs cut poorly.
Some of the best-value restoration kits overall are drill-powered — we flag which in our ranked roundup: see our ranked restoration kits. And if you're on a tight budget, a few capable drill kits sneak in cheap — check best budget kits under $20.
Getting good results with a drill
The drill makes it faster, but technique still matters. A few things I've learned:
- Keep the sanding stages wet. Same rule as hand-sanding — water lubricates, clears slurry and stops heat. A dry disc gouges and can melt plastic.
- Light pressure, keep it moving. Let the speed do the cutting. Don't lean on it, and never park the spinning disc in one spot — that's how you burn a hollow or overheat the lens.
- Moderate drill speed. If your drill has variable speed, keep it in a controlled mid-range rather than flat out. More control, less risk.
- Don't skip grits. Even powered, you must step through the grits in order. Skipping leaves scratches the polish can't remove.
- Tape the paint. A spinning disc that wanders onto your paint does damage quickly. Mask around the lens well.
Then — always — seal it
I'll keep hammering this because it's where drill users get lulled. The speed and shine of a drilled lens can look so good that people call it done and drive off. But a drill does nothing about UV protection — you've still sanded off the factory coating, and bare plastic re-yellows just as fast whether you removed it by hand or by machine. Finish every drill restoration with a UV sealant. That final ten minutes is what makes the whole job last a year or two instead of a couple of weeks.
Bottom line: if you own a drill, an attachment kit is usually the better buy — faster, more even, and easier on your arms, for only a little more money. Respect the spinning disc, keep it wet, climb the grits, and seal it at the end. Do that and you'll get near-professional clarity in a fraction of the time hand-sanding takes.
Recommended Restoration Kits
We aggregate owner ratings rather than testing ourselves. These are the well-reviewed kits that pair powered sanding with a proper UV seal — check the drill compatibility and that a sealing step is included before you buy.
Best for a complete drill-driven kit with the sanding-to-seal steps
- Drill-powered sanding discs plus a UV clear-coat
- Full grit progression, not one or two discs
- Includes the sealing step that makes it last
Why buy it: the kit most people should buy — it powers the sanding stages and, crucially, finishes with the UV seal that stops re-yellowing.

Best for a proven drill-attachment kit at a low price
- Drill-mounted discs step through the grits
- Trusted brand with a huge owner base
- Confirm a sealant, or add one separately
Why buy it: a cheap, well-regarded drill kit that delivers the even, powered sanding this guide recommends over hand-sanding.
Best for the longest-lasting clarity thanks to a ceramic seal
- Wipe-on ceramic coating for durable UV protection
- The sealing step is where most kits fall short
- Pairs with any drill sanding to lock in clarity
Why buy it: the standout for longevity — its ceramic top coat is exactly the durable UV barrier a drilled lens needs to stay clear.

Best for badly fogged lenses where powered sanding really pays off
- Drill-driven pads for tackling heavy fog fast
- More cutting power for severe oxidation
- Still finish with a UV protectant
Why buy it: the pick when oxidation is severe — the drill and coarser cut chew through heavy yellowing that would exhaust you by hand.
Prices are pulled from Amazon and were accurate as of Aug 22, 2026, 6:54 PM EDT. Product prices and availability are subject to change — the live price is shown on Amazon.