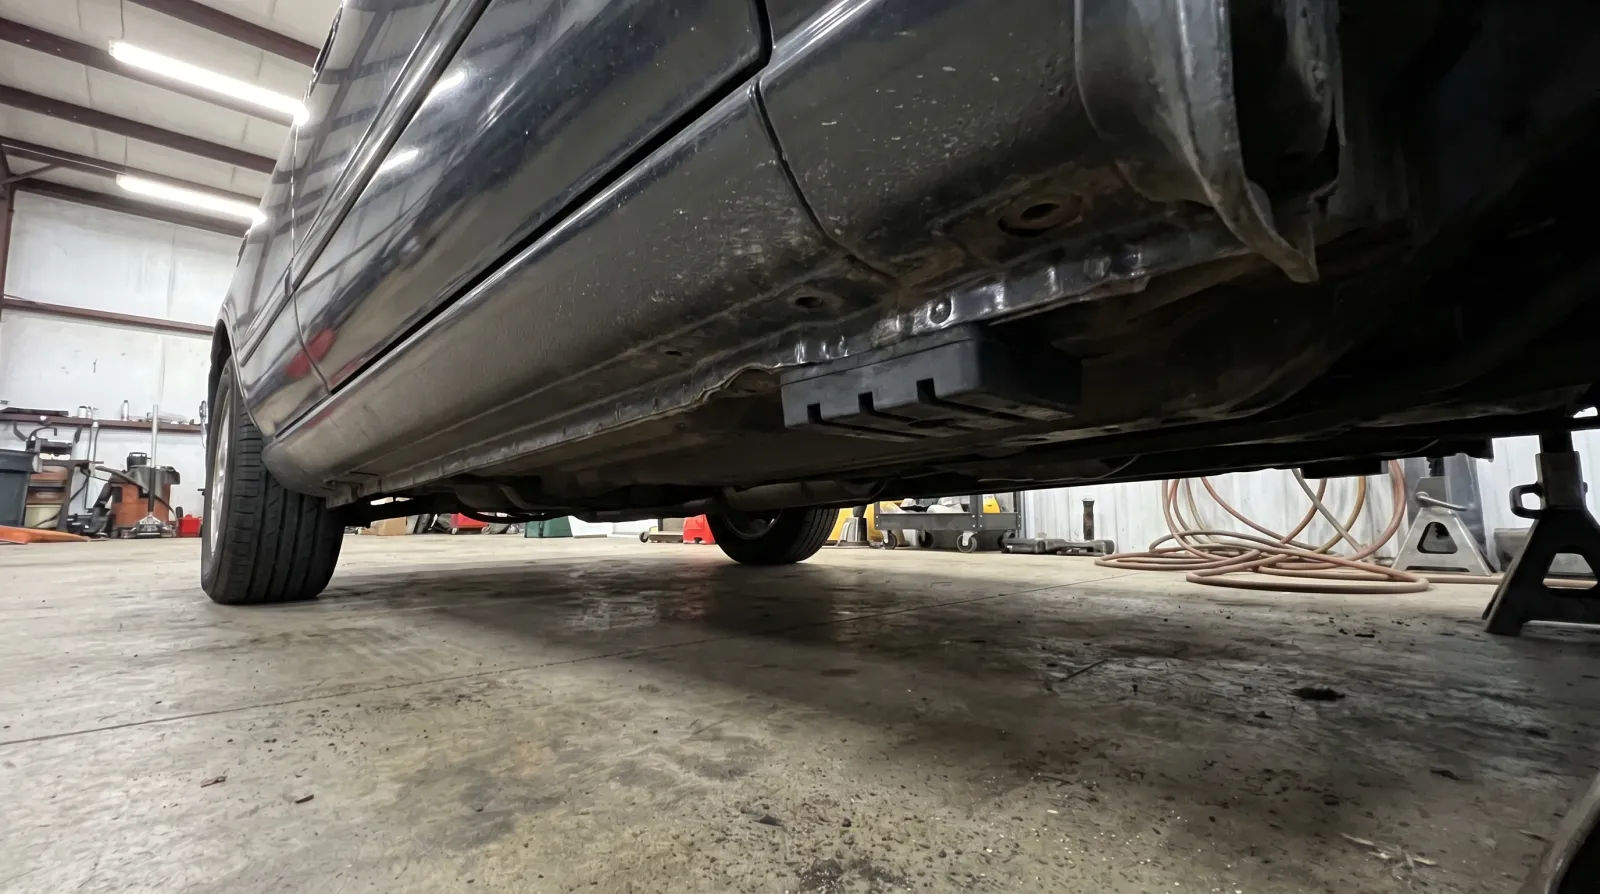
Every year, cars slip off poorly placed jacks and crush people. The fix is not complicated — you just need to know where your manufacturer actually designed the car to be lifted, and where it absolutely was not. This guide covers pinch welds, factory notches, solid frame members, and the spots that will crack, bend, or give way without warning. Read it once. Then open your own manual and confirm every point on your specific car before you pick up a wrench.
Start Here: The Owner's Manual Diagram Is the Only One That Counts
Before anything else, pull out your owner's manual and find the jacking diagram. Every manufacturer publishes one. It shows the exact lift points for your make, model, and year — not a generic car, not a “similar” platform, yours. It usually lives in the emergency section alongside the spare tyre instructions, somewhere between pages 200 and 350 depending on the brand.
The diagram will show a side-view or underside sketch of your car with arrows or icons pointing to approved contact points. Some brands (Honda, Toyota, Mazda) mark these physically on the car itself with a small triangle, arrow, or notch stamped into the rocker panel. Volkswagen and Audi often use a small rubber plug that pops out to expose a reinforced sleeve. Either way, the manual is the final word. Nothing in this article overrides it.
If you have lost your manual, the manufacturer's online portal or a quick search for “[year make model] owner's manual PDF” will get you a free copy. You can also check our Jacking Up a Car pillar hub for model-specific resources and a guide to jack points by car type — but always verify against your own diagram first.
What Is a Pinch Weld?
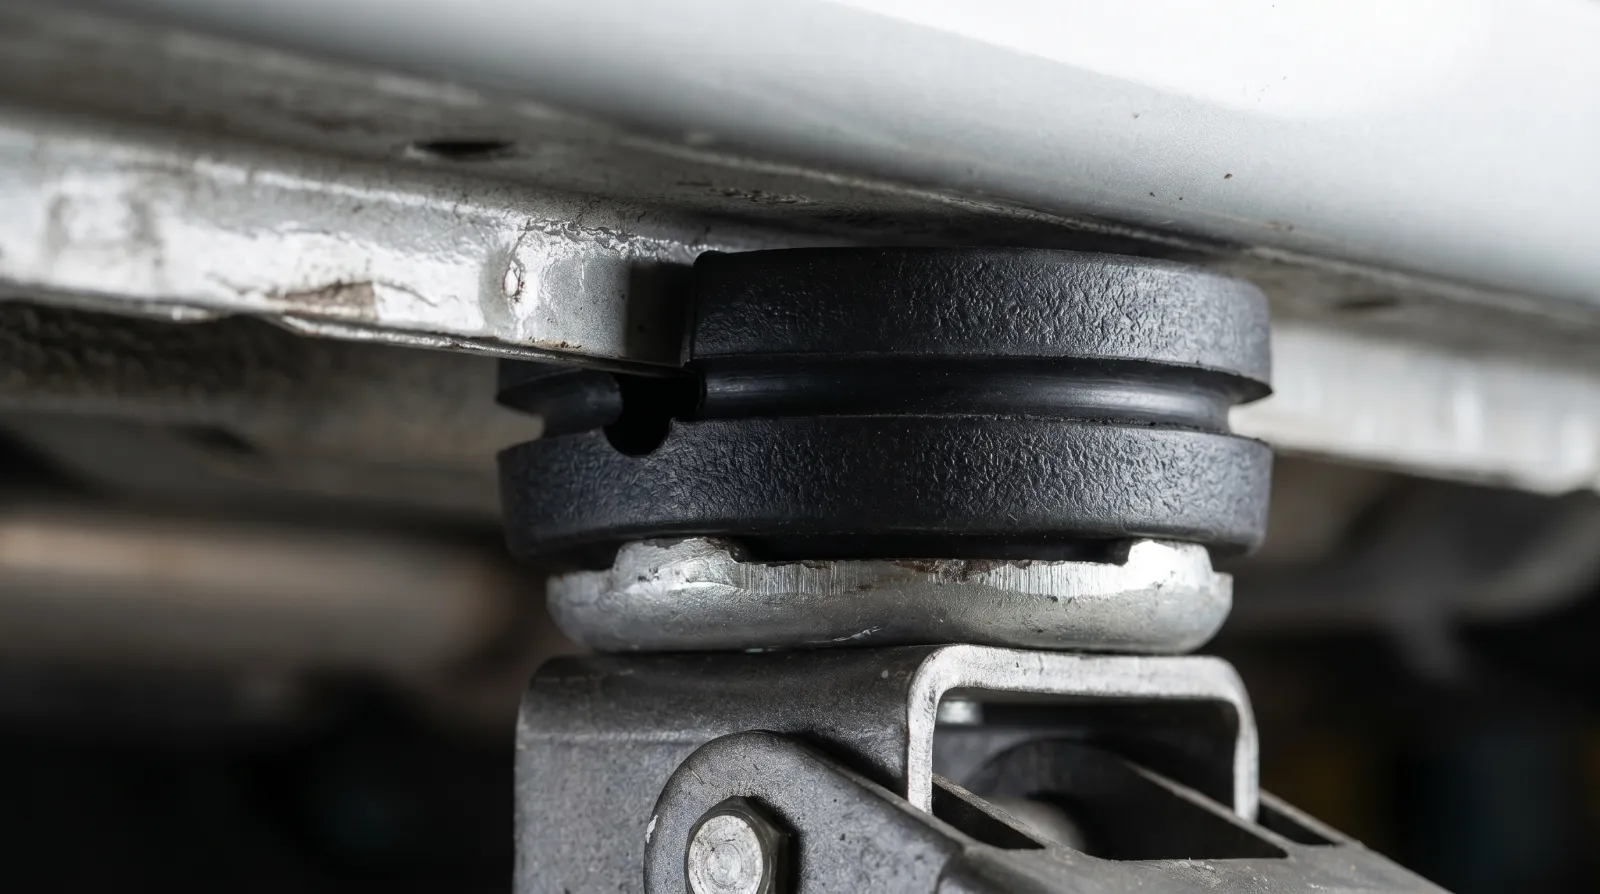
The pinch weld (also called a rocker seam or sill flange) is the thin, folded metal lip that runs along the underside of your car between the front and rear wheels. It is where two large pressed steel panels — the inner floor pan and the outer sill — are welded together to form the body's lower perimeter. The result is a flat, two-layer flange roughly 10–25 mm wide that protrudes downward from the sill.
On most passenger cars, the pinch weld is the manufacturer's primary designated jack point for the standard scissor jack that ships in the boot. The logic is sound: the weld connects to the main body structure above it, so load is transferred correctly. But here is the catch — pinch welds are designed for the narrow, slotted saddle on a scissor jack. A standard cup-style hydraulic floor jack saddle is too wide and will contact the outer edge of the flange, not the centre. Under load, that crushes and deforms the flange, which is cosmetically ugly and can make future lifting harder.
Pinch Weld Adapters: Use One Every Single Time
A slotted jack pad, puck, or pinch-weld adapter is a small rubber or polyurethane block with a channel cut into it that cradles the flange. You set it on your floor jack saddle, slide the slot over the pinch weld lip, and the load spreads across the reinforced area of the seam rather than crushing the edges.
They cost under $30 for a set of four. For JDM cars in particular — older Civics, 86s, Supras, Silvia — the sill flanges can be thin from age and any previous contact damage. An adapter is cheap insurance against bent metal and a jack that slides off mid-lift. Do not skip it.
Finding the Factory Notches and Arrows
On many cars, the manufacturer stamps a small notch or V-shaped cutout into the pinch weld flange at the exact approved jacking position. This tells you exactly how far forward or back to position your jack. On Japanese cars especially, look for these between the B-pillar and the wheel arches on both sides. Some have a moulded arrow in the plastic sill trim above the flange. If you see one, that is your spot — but still confirm in the manual, because not every notch is a lift point. Some are drainage holes.
Front Lift Points: Subframe and Cross-Member
When you need to get the front of the car up entirely — to do brake work, swap struts, or drop the engine — you need a solid structural member that can handle the whole front axle load. The pinch weld cannot do that job.
The Front Subframe
Most front-wheel-drive and all-wheel-drive cars have a front subframe (also called a cradle or K-frame) — a steel or aluminium frame bolted to the body that carries the engine mounts, control arm pivots, and steering rack. It is typically visible directly behind the front bumper, running side-to-side in a roughly rectangular loop.
The centre cross-member section of the subframe is usually a safe place to position a floor jack for lifting the entire front end. Look for flat, unpainted or powder-coated steel — not plastic, not a rubber mount, not a thin brace. Some manufacturers explicitly call out the subframe cross-member in the jack point diagram. Others do not mention it at all, which means you should only use it if you have a workshop manual (not just the owner's manual) that confirms it is approved for floor-jack contact.
Rear-wheel-drive cars and trucks may have a solid front differential housing or a heavy crossmember that is safe. The same rule applies: confirm the specific point in documentation before lifting.
Where to Put Jack Stands Under a Car
A floor jack is a lifting tool, not a holding tool. Once your car is at height, it must go on jack stands before you get anywhere near it. This is where many DIYers get confused about the difference between jacking points (where you lift) and stand points (where you support the car at height).
The good news is that the structural members strong enough to lift from are also the right places to stand from — with some caveats.
Front Stand Points
For front stands, you have two solid options on most cars:
- Pinch weld (with adapter): Fine for supporting the car at height on stands if the stands have a saddle that cradles the flange properly. Slotted rubber pads on the stand heads work well here.
- Front subframe outer rails: On many cars you can position stands under the subframe on each side, close to where the frame rail meets the body. Check your workshop manual for approved stand points — they are often different from the lift point.
Rear Stand Points: Differential and Rear Axle
The rear of the car depends heavily on whether you have an independent rear suspension (IRS) or a solid rear axle.
Solid rear axle (most trucks, older RWD cars, some SUVs): The rear axle housing is a thick steel tube running the full width of the car. It is one of the most solid jack and stand points on any vehicle. You can jack from the centre of the diff housing and place stands under the axle tube itself on both sides, close to the wheel. Check your manual to confirm, but solid axles are usually straightforward.
Independent rear suspension: There is no solid axle to use. Instead, look for the rear subframe cross-member (same concept as the front — the steel cradle that carries the rear suspension pivots). Place your floor jack under the centre of the rear subframe, lift, then position stands under the outer rails of the rear subframe or — on many cars — under the pinch weld at the rearmost approved stand position shown in your diagram.
The rear differential on IRS cars (common on JDM sports cars like the Nissan Silvia, Subaru WRX, and Toyota Supra) is a cast-aluminium or iron housing bolted to the rear subframe. It can be used as a jack point in some cases, but it is not universal — the alloy housing on some newer cars is not rated for a floor jack saddle. Confirm in the workshop manual before contacting it.
For a full breakdown of which stand positions suit different car layouts, see our jack points by car type guide.
What Not to Lift On: The Full List
This is where cars get wrecked and people get hurt. Some of these look like they should hold — they do not.
The Floor Pan
The floor pan is the large stamped-steel sheet that forms the floor of the cabin. It is not structural in the way a frame rail is. Placing a floor jack under flat floor pan steel will dent or puncture it. On uni-body cars especially, a bent floor pan affects the entire body structure. Never lift here.
The Oil Pan / Sump
This one kills engines. The oil sump is cast aluminium on most modern cars — it cracks easily under point load. Even a crack that looks minor will drain your oil the moment you start the engine. Some shops have seen people try to jack from the sump because it looks like a solid lump near the centre. It is not a lift point under any circumstances. If your jack slips and contacts the sump, inspect it carefully before starting the engine.
Control Arms
Control arms are suspension components, not structural pillars. They are designed to pivot under spring and damper load, not bear the static weight of the whole car. Jacking on a control arm can bend it, damage the ball joint, and alter your suspension geometry in ways you may not notice until a wheel tucks at speed. Leave them alone.
Plastic Undertray and Aero Panels
Modern cars increasingly ship with full plastic undertrays for aero and thermal management. They look like a smooth floor beneath the engine bay. They are plastic. A jack saddle will go straight through them. Always push through or around the undertray to reach metal before lifting. Many undertrays clip out in sections — a panel removal tool and two minutes is all it takes to get access to the actual subframe.
The Radiator Crossmember
The thin steel bar that sits behind the front bumper and holds the radiator cradle looks structural. On most cars, it is not. It is a support for crash structure and cooling components, rated for those loads only. Putting a floor jack under it will bend it and may push it into your radiator. Find the subframe instead.
A Quick Summary: Lift Here, Stand Here, Never Touch That
| Location | Lift With Jack? | Stand Here? | Notes |
|---|---|---|---|
| Pinch weld (with adapter) | Yes | Yes (with puck) | Use slotted pad/puck every time |
| Front subframe cross-member | Yes (confirm) | Often yes (outer rails) | Check workshop manual for model |
| Solid rear axle housing | Yes | Yes (axle tube) | Most straightforward rear point |
| Rear subframe | Yes (confirm) | Yes (outer rails) | IRS cars; confirm stand position |
| Floor pan | Never | Never | Will dent or puncture |
| Oil sump / pan | Never | Never | Cracks aluminium, kills engine |
| Control arms | Never | Never | Bends, damages ball joints |
| Plastic undertray | Never | Never | Will puncture immediately |
| Radiator crossmember | Never | Never | Not rated for full vehicle weight |
Step Back, Open the Manual
The three most common jacking mistakes — crushed pinch welds, cracked sumps, slipped stands — all share the same root cause: someone guessed instead of checking. Your owner's manual diagram takes thirty seconds to find and it shows you exactly where to lift and where to stand. Print the page, tape it inside your workshop door, and check it every time you work on a new-to-you car.
For the step-by-step process of actually getting the car in the air safely, read our how-to-jack-up-a-car guide. And if you are not sure which lift strategy suits your car type — FWD hatchback, RWD coupe, four-wheel-drive ute — the jack points by car type page breaks it all down. Both link back to the main Jacking Up a Car hub where you will find every guide in the series.
Always confirm jack and stand positions against your own vehicle's owner's manual or workshop manual diagram before lifting. The information here is general guidance only — your car's specific approved points may differ.
Affiliate Disclosure
Some links on this page are affiliate links. If you buy through them we may earn a small commission at no extra cost to you. It never changes our verdicts — we only recommend gear we would run on our own cars. Read the full disclosure.